

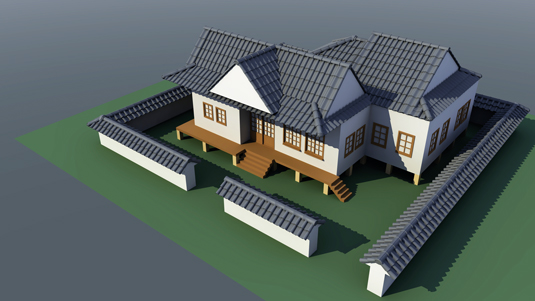
Design Your Own Home 3d
LWCad has long been a favourite suite of plug-ins for LightWave users. It is a full package of CAD tools including features such as real-time booleans for curves and polygons, a full snapping engine, and completely unique arch-viz tools.
This tutorial is aimed at teaching you some of the more common LWCad tools used while you create a traditional-style Japanese home in a short amount of time. This model could be used in a game environment or, with some additional details, it could be used for close-up renders as well. With some small adjustments and variations you could quickly create an entire neighbourhood.
Included along with the tutorial are some LWCad presets for doors, windows and roof tiles that are specific to Asian architecture; download them here. I will assume you have a basic understanding of LightWave and already have the LWCad suite installed, including its menu branches.
01. Setting up the presets
The included preset files will need to be placed in the Presets directory. The first thing to do is to look at the LWCad options and make sure that you have the Presets directory selected so that the plug-ins know exactly where to look when loading the libraries and other files.
For the next stage, you will need to extract the files from the Included Presets.zip directly into the Presets folder. The files should all end up in their correct folders.
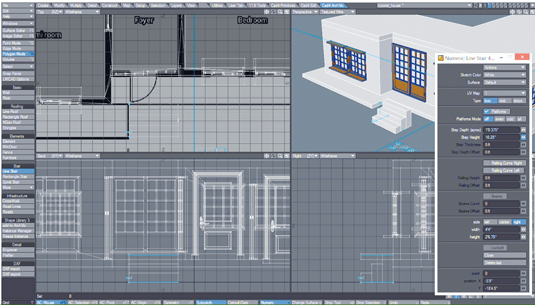
02. Floor plan image
Included with this tutorial is a floor plan image I created. This can be used as a guide for the shape of the house. Firstly, create a polygon on the X-Z (ground plane) sized to 51'1"w by 43'5"d and press [F2] to centre it. Next, open the Display Properties with the [D] key and look at the Backdrop tab. Load the floorplan.png image, pick your Top viewport and click the Autosize button.
This will automatically scale the image in the viewport to fit inside of the polygon. In the Image Editor adjust the Saturation to 0 and reduce the Brightness a little, so that you can see the white wireframes on top of the image.
It's a good idea to save a preset of this on the Display Properties so that you can easily load it again after closing Modeller. You can now safely delete the polygon as it is not needed any longer.
On the Archviz LWCad tab select the Wall tool, adjusting height in Numeric to 10'. Click the corners of the outer wall in the Top viewport, holding the [Ctrl] key to ensure walls are straight. If you click one side of the wall but the wall object is created on the other side, use the Left/Right/ Centre buttons in the viewport or on the Numeric panel, to make the wall follow the floorplan.
When you get to the last wall of the house click the Close button on the Numeric panel to finish it off. Before starting inner walls, ensure the Add button is selected. This merges new walls with existing ones. When you are finished with the walls click the Floor tool, ensure Floor is selected in its options, then click in the Top viewport to create a floor.
LWCad 4.5 has one tool for creating both windows and doors, called Windoor. Open it from the Archviz tab and tick the Numeric box for Wall Grid. This grid snapping will help to keep your windows and doors the right size.
You might also want to tick the box for Show Dimensions to make sure that you are getting the sizes right. To do this, tick Enable Layers and then pick the Door option. Pick the Japanese Doors Library item and then choose the Shoji Door Frame.
Now pick Layer 2 and tick Activate Layer. For this layer you should pick the Japanese library again and the Shoji Door item. Using the grid, draw a door in the front of the foyer. When its shape is correct, click the Fix button in the viewport to lock this size.
Now, right click and you can add more of these to the back of the Tatami Room and to the left of the dining room. Be sure to unclick the Fix button when you are finished with this door. You can use the same technique to add the Fusuma doors between the Foyer and Tatami Room and between the bath and changing room.
Before starting the roof use the Floor tool again, this time with the ceiling button selected. Then move to a new layer with the current house in the background.
The Roof tools in LWCad will automatically cut into each other like a Boolean Add operation so that you are able to layer the different types of roof.
Start with the Rectangle Roof tool and set it to Hipped. Keep it fairly flat with the Side Slope in Numeric and in the Top viewport draw out two wide roofs for the front and back sections of the house, making sure that you cover the deck areas.
If the roofs are created at the ground plane drag them up until they snap to the top of the ceiling, before right-clicking to finish each one.
For a lower resolution building you can leave the roof as it is and apply a shingle texture to it. But for a more realistic roof, LWCad can automatically apply polygonal shingles or tiles. Be sure that you
are on your roof layer and that the house layer is not visible at all.
Now, pick the Shingle tool from the Archviz tab and simply click in
the Top viewport to see the roof instantly covered in shingles. On Numeric you will see numerous settings for adjusting the shingles but for now you should just look at the Presets near the top. Here, you will find several types of shingle effect that come with LWCad as well as the Japanese preset that I have included.
07. Final touches
Raise the house and roof off of the ground about two feet with the standard Transform tool. Then use the Line Stair tool to place stairs at the edge of the deck in front of the main door. Do this by first clicking in the top viewport slightly away from the house, then click- dragging towards the deck.
You can use snapping plus the Left/Right/Centre buttons in the viewport to arrange the stairs correctly. In Numeric, use Step Height to raise them until they are flush with the deck. You can use some simple boxes to make support columns under the rest of house. As a final step you can then use the wall and roof techniques detailed earlier to make a wall around the property.
Words: Phil Nolan
Phil Nolan is a freelance artist working mostly in television, commercials and corporate videos.
This article originally appeared in 3D World issue 174.
Liked this? Read these!
- Create a perfect mood board with these pro tips
- The best 3D movies of 2013
- Download free textures: high resolution and ready to use now
Design Your Own Home 3d
Source: https://www.creativebloq.com/3d/how-build-3d-home-7-simple-steps-11410337
Posted by: troyothere.blogspot.com
0 Response to "Design Your Own Home 3d"
Post a Comment